
We Truly expect our Door-Seal to Meet…
I Truly expect our Door-Seal to Meet…
…No Exceed your Expectations!
Mike This is the -01 Seal Manual
Thank you for your purchase. Click here to see the -02 Manual
We ship with the double back tape. We feel that the tape should be applied to the door 1st, then align the Seal to the other sticky-side. You may (Should) permanently glue the seal in place after compression-fit around the airframe has been established, maybe 3 months, or 2 yrs. But 1st; use masking tape to hold seal in place to get a feel of how and where the –01 Seal will fit the best.
Thank you for your purchase.
Other fine AvTek products are: Pulsar, 1st Alert and StdBy Elect Units, and Digital Voltmeters, New FAA-PMA products soon.
FAA-PMA Approved… log-book entry.
Door-Seal “Applied For” REGISTERED Trade Mark of AvTek.
It's Name and Product is protected by Law. Law prohibits any Reuse.
QUALITY PRODUCTS SINCE 1983
PROUDLY MADE 25230- 45TH Ave. SO.
As with any product designed and sold to Aircraft owners, we at Aero-PMA-Parts Company and AvTek feel that our product has been tested and retested NOT for FAA-Approval, but for OWNER-Approval. Pictures used in this manual are Piper-Door’s. The same principal applies with all aircraft, albeit: Piper, Cessna, Mooney, Beech.
If owner is attempting to install, PLEASE have all your work inspected by a licensed A/p prior to the 1st flight.
The FAA- would not allow us to name any specific adhesive, due to the “Conformity, and Controllability” in years to come. Instead, it’s up to the mechanic to determine the correct adhesive. However, any “Polyurethane” adhesive works great with rubber. The “Double-Back” Tape we provide is a “Fiber-Glass” base tape and it’s holding powers are among the best available. BUT, it is intended to be “Temporary” for holding the Seal. It will allow you to get a “Feel” for how the Seal fits your door… Our Seal with double back tape is still going strong one (1) year later with no signs of letting go. You may never need to use any glue.
Should you choose to apply Polyurethane adhesive in the future found at any building supply and hardware stores, follow those manufactures instructions. Customers have told us they used all types of glue Thin layer applied to both surfaces, and wait until “Tacky” is always appropriate. The fiberglass tape makes an excellent base material for future glue.
Temperature must above 40 f otherwise poor results may occur.
Please read inside and apply the “Fiber-Glass” tape as instructed, by Aero-PMA-Parts Company, Partner Company of AvTek.
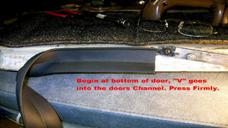
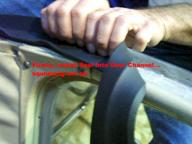 ¬Press “V” into
Channel
¬Press “V” into
Channel
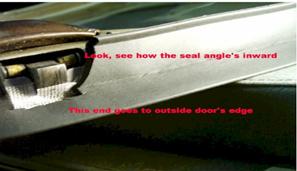
Seal’s “V” is pressed into doors channel. With 1/8” to ½” seal protruding past doors outside edge. This allows “Squeeze-Out” when door is closed. The angle end of seal folds inward.
Do NOT over trim Seal. Once the seal is cut you CAN-NOT put-it back on. We do not want OUR seal on your hangar floor.
NOTE THE FOLLOWING:
The –01 Seal as shown inside this manual can be Purchased separately or with our –02 Air-Chamber Seal. If you received a Seal-Kit that has two different Seals, then you Purchased the “Air-Squeeze –01/-02 Kit.” The larger –01 goes in the Rear TOP & Bottom of your Door where the GAPS are largest…NOT all the way around. The Smaller –02 air-chamber is installed near the hinges, again NOT all the around. They butt together.
This is the -01 Seal Manual
Installing Aero-PMA-Parts Company Door-Seal is simple and easy to do. However; some might rush any simple job
anticipating the completion only to have ruined the product. Many important steps MUST be followed.
We clearly believe our “Squeeze-Out” Door-Seal when properly installed and allowed to completely “Form-Fit” to your airframe (may take a couple days or week)…will seal out Cold-Wind and water like NO OTHER seal can…
We have (5) Seals in all.
We are committed to your complete satisfaction., Since 1983…
First…removing the Door must be done to allow the removal of the old seal, and apply the NEW Seal. Old seal removal and installing new seal cannot be done with the door attached to the aircraft.
We will not provide instructions to the aircraft owner on removal and/or reinstall the aircraft door, due to this operation is NOT listed as one of the FAA-Approved maintenance items that the owner is allowed to do. Legal disclaimer done. But, Heat-Gun & Putty-Knife is the best way.
Remove old seal: it’s ugly work, but it all must go.
Make sure to clean the “Door-Channel” with strong cleaner. Tip: Heat-Gun speeds up the removal process. Take care NOT to damage the window, and paint. Use soft blankets.
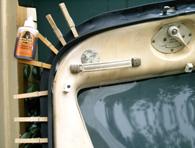
Applying the double-back tape. Remove wax paper side 1st.
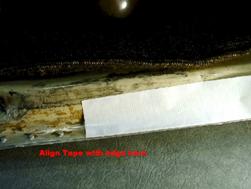
Start at the door’s bottom making sure the tape aligns up with the edge of door. Press tape firmly into channel.
Below is door completely
taped and ready for seal. 
Start applying the seal at bottom of door, moving aft towards the rear of the Door where the Latches are. Then see –02 manual.
With door flat, the seal is angle upward, see above & next side.
Below: Seal’s angle is inward when door is closed, allowing seal to hug the Air Frame, when the door is closed. Which seals in warmth.
While the other side of the Seal (without the angle) protrudes 1/8” to 3/16” beyond the doors outside edge, allowing the seal to be squeezed-out, when shut. Even ½” extension is Ok. You want Squeeze-Out. This Seals the Door.
After seal has been applied, and if door is to be installed the next day, apply cloths-pins to the seal overnight, see aero-pma-parts.com
 Perm-Glue in after seal is correctly tapped in place and door
closes. Maybe 3 months later.
Perm-Glue in after seal is correctly tapped in place and door
closes. Maybe 3 months later.
At this point you are done, and ready to put the door back on.
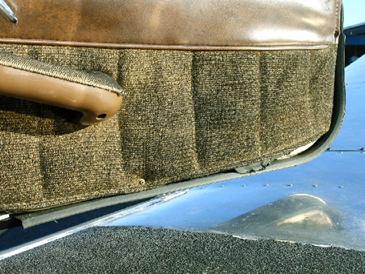
Caution: If your aircraft is 20 years or older…your inside “Wind-Lace” trim is Rock hard, and BRITTLE. This might prevent the door from closing. See below: Cherokee, & other Pipers.
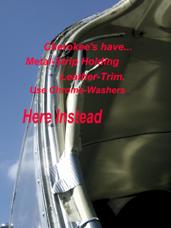
Inside leather trim (Above) Might need to be removed no matter how old it is, before re-installing the door. After-wards, simply adjusting the inside “Wind-Lace” to fit your NEW door-seal.
Note: If the door will NOT close after adjusting…The metal strip in some cases needs to be replaced w/chrome finish washers.
The door-lock-latch is adjustable and will need adjusting, to accommodate the new seal. Your aircraft has never been properly sealed before and adjustments are needed. Note: -02 s/b used near the hinges…and NO TRIMMING should be needed.
Trim excess -01 Door-Seal as needed, as with any door-seal as it is closes, excessive seal material will “Bind & Prevent” your Door from Closing. Make small “Bias” angle cuts using sharp razor blade. However, remove all inside trim and make latch adjustment 1st, before trimming. When applied properly, our door-seal will make your aircraft tightly sealed.
This what YOU want. Click here to see the -02 Manual
Trim wisely, little at a time. Don’t rush. Hint: Use Razor-Blade & make small angle cuts to the seal at forward edge of door-seal where it may rub.
All Products